When you create your first folder in Semrush, Site Audit is automatically configured and launched for the domain you provided. You can view the results by navigating to the Site Audit tool from the left-hand menu or the home page once the initial crawl is complete.
For any subsequent folders you create, you will need to configure Site Audit manually. To do this, create a new folder from Site Audit and follow the prompts to configure and launch your audit campaign.
If you are having problems getting your Site Audit to run, please reference Troubleshooting Site Audit for help.
General Settings
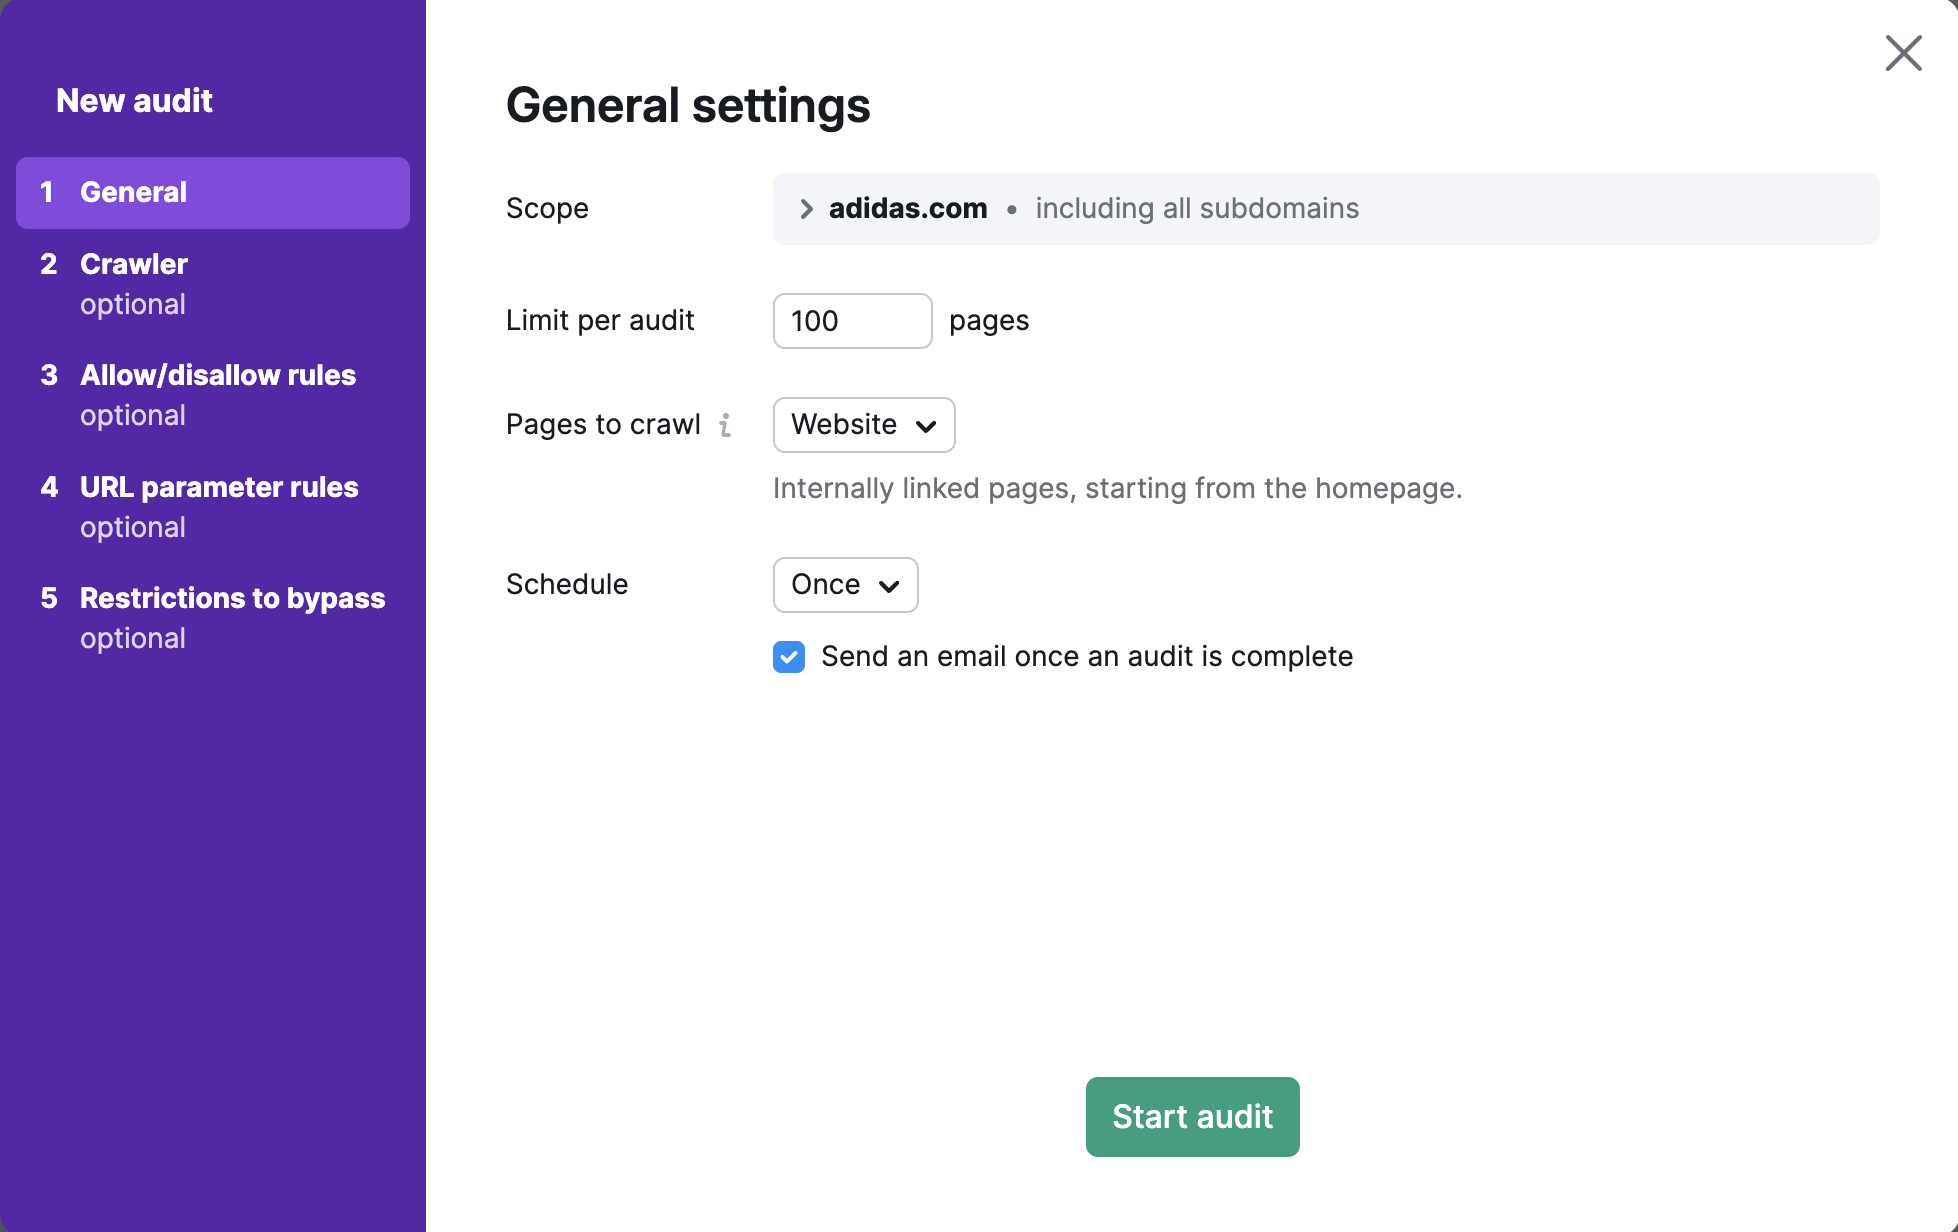
You’ll be taken to the first part of the setup wizard, titled "General settings." From here, you can either choose to “Start audit,” which will immediately run an audit of your site with our default settings, or proceed to customize the settings of your audit to your liking. But don't worry, you can always change your settings and re-run your audit to crawl a more specific area of your site after your initial setup.
Crawl Scope
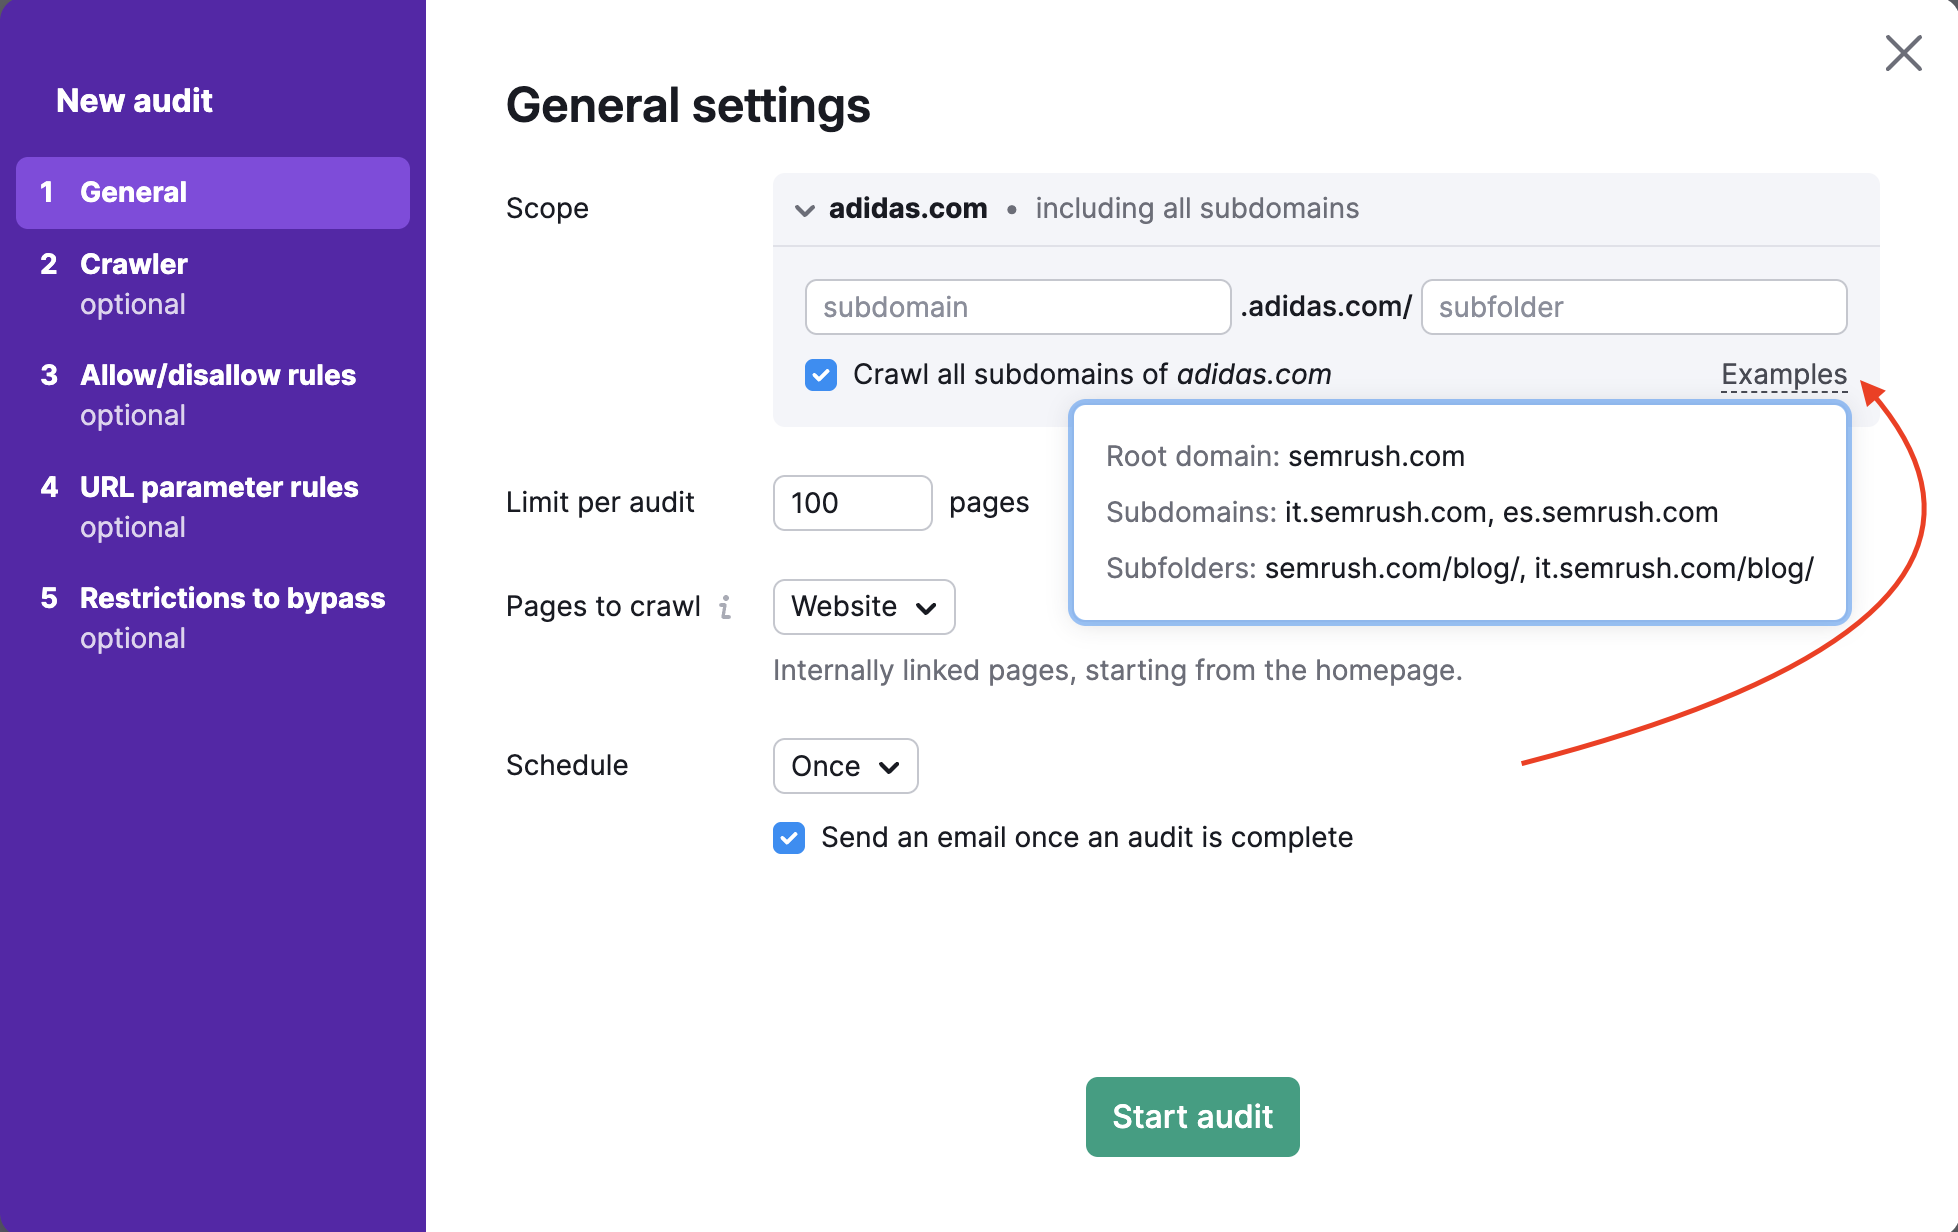
To crawl a specific domain, subdomain, or subfolder, you can enter it into the “Scope” field. If you enter a domain in this field, you’ll be given the option to crawl all subdomains of your domain with a checkbox.
By default, the tool checks the root domain, which includes all available subdomains and subfolders of your site. In Site Audit settings, you can specify your subdomain or subfolder like a crawl scope and uncheck "Crawl all subdomains" if you don’t want other subdomains to be crawled.
For example, you want to audit only the blog of your website. You can specify the crawl scope as blog.semrush.com or semrush.com/blog/ depending on whether it’s implemented as a subdomain or a subfolder.
Limit of Pages per Audit
Next, select how many pages you want to crawl per audit. You will want to choose this number wisely, depending on the level of your subscription and how often you plan on re-auditing your website.
- Pro SEO Toolkit users can crawl up to 100,000 pages per month and 20,000 pages per audit
- Guru SEO Toolkit users can crawl 300,000 pages per month and 20,000 pages per audit
- Business SEO Toolkit users can crawl up to 1 million pages per month and 100,000 pages per audit
Pages to Crawl
Setting up "Pages to crawl" determines how the Semrush Site Audit bot crawls your website and finds pages to audit. In addition to setting the crawl source, you can configure masks and parameters to include or exclude from the audit in steps 3 and 4 of the setup wizard.
There are 4 options to set "Pages to crawl": Website, Robots.txt sitemap, Sitemap by URL, and a file of URLs.
1. Crawling from Website means we will crawl your site like the GoogleBot, using a breadth-first search algorithm and navigating through the links we see on your page’s code—starting from the homepage.
If you just want to crawl the most important pages of a site, choosing to crawl from Sitemap instead of Website will let the audit crawl the most important pages rather than just the ones most accessible from the homepage.
2. Crawling from Robots.txt sitemap means we’ll only crawl the URLs found in the sitemap linked in the robots.txt file.
3. Crawling from Sitemap by URL is similar to crawling from “Robots.txt sitemap,” but this option lets you specifically enter your sitemap URL.
Since search engines use sitemaps to understand which pages they should crawl, you should always try to keep your sitemap as up-to-date as possible and use it as a crawl source with our tool to get an accurate audit.
Note: Site Audit can only use one sitemap URL as a crawl source at a time, so if your website has several sitemaps, the next option (Import URLs from file) may work as a workaround.
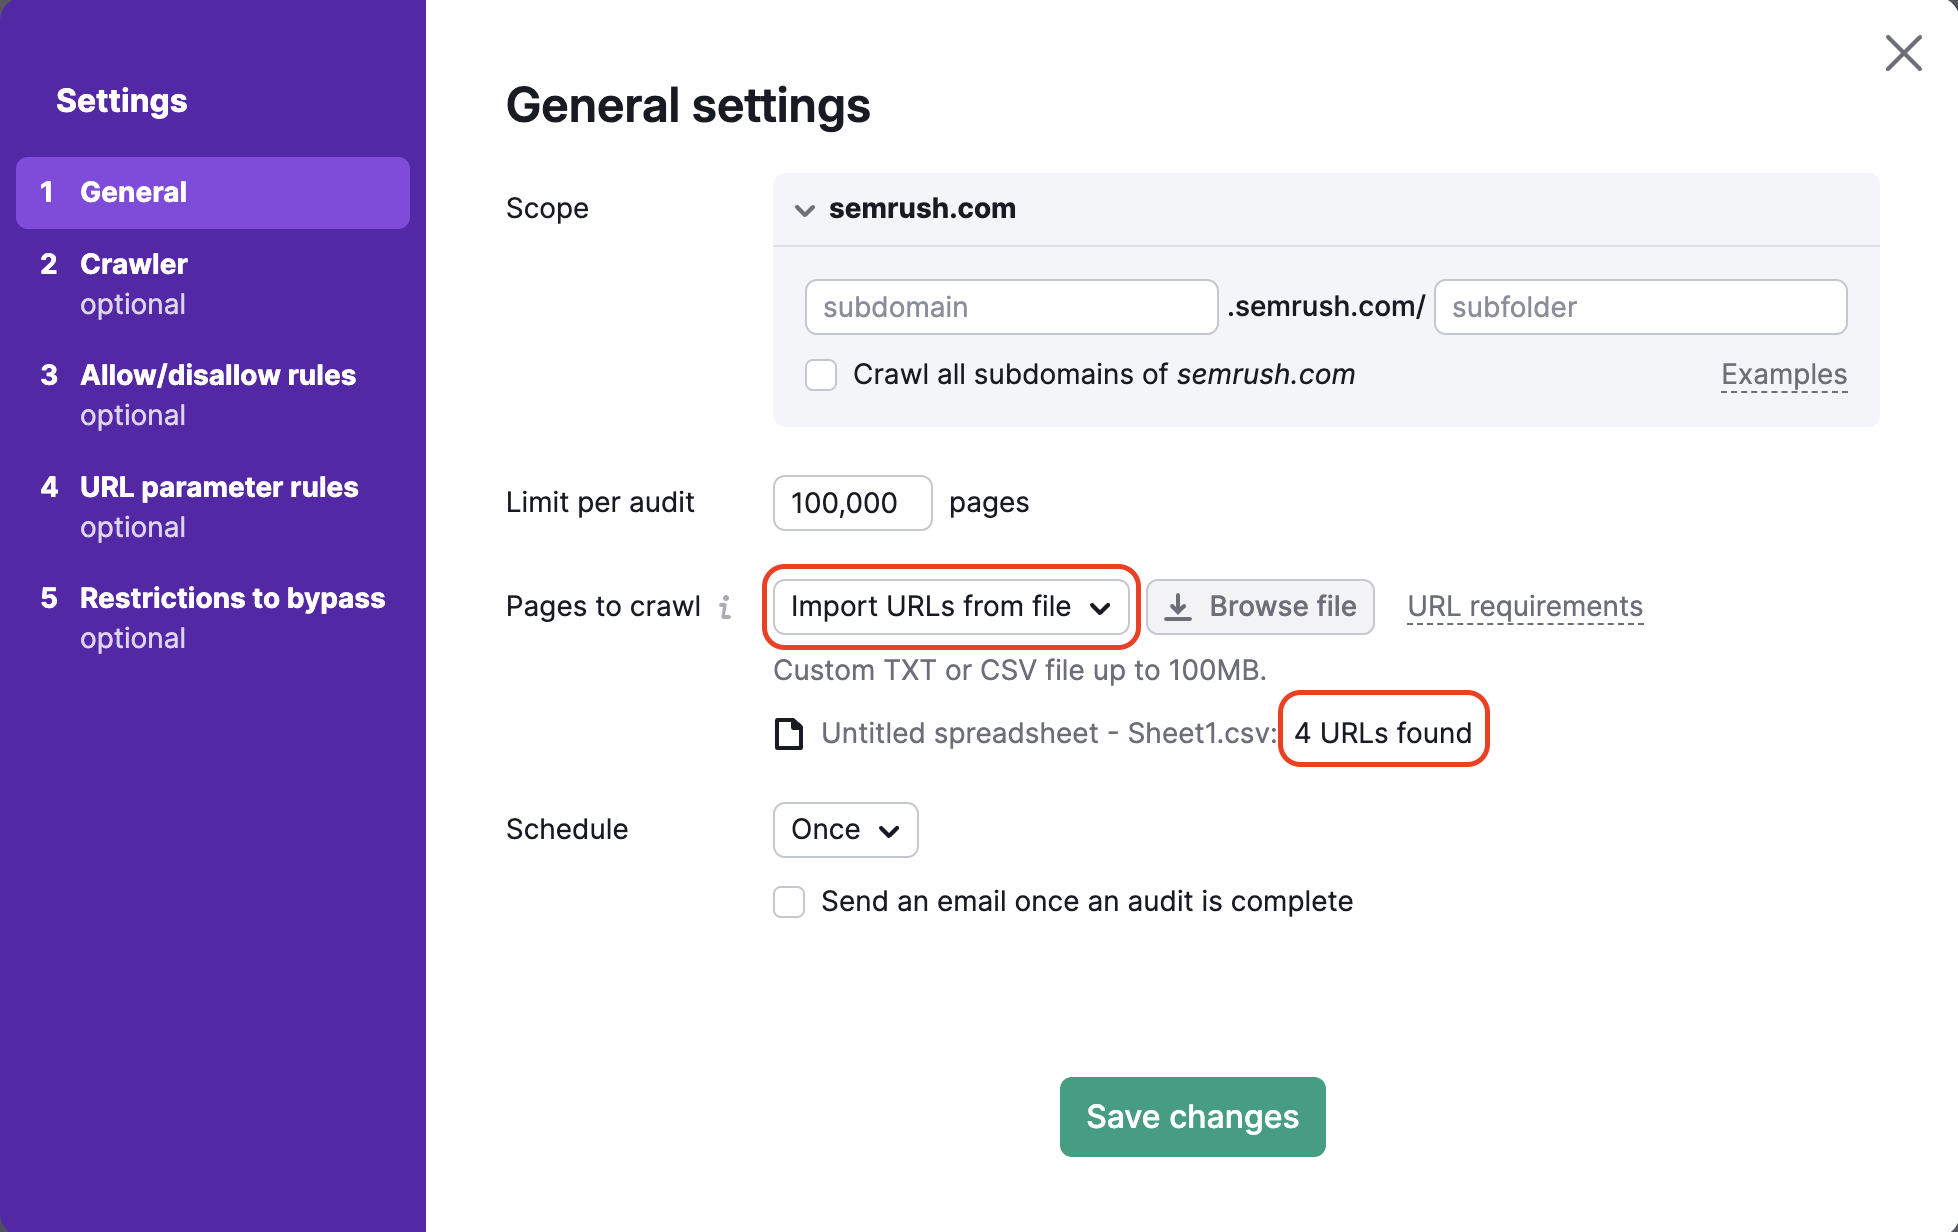
4. Crawling from a file of URLs lets you audit a super-specific set of pages on a website. Make sure that your file is properly formatted as a .csv or .txt with one URL per line, and upload it directly to Semrush from your computer.
This is a useful method if you want to check on specific pages and conserve your crawl budget. If you made any changes to only a small set of pages on your site that you want to check on, you can use this method to run a specific audit and not waste any crawl budget.
After uploading your file, the wizard will tell you how many URLs were detected so that you can double-check that it worked properly before running the audit.
Schedule
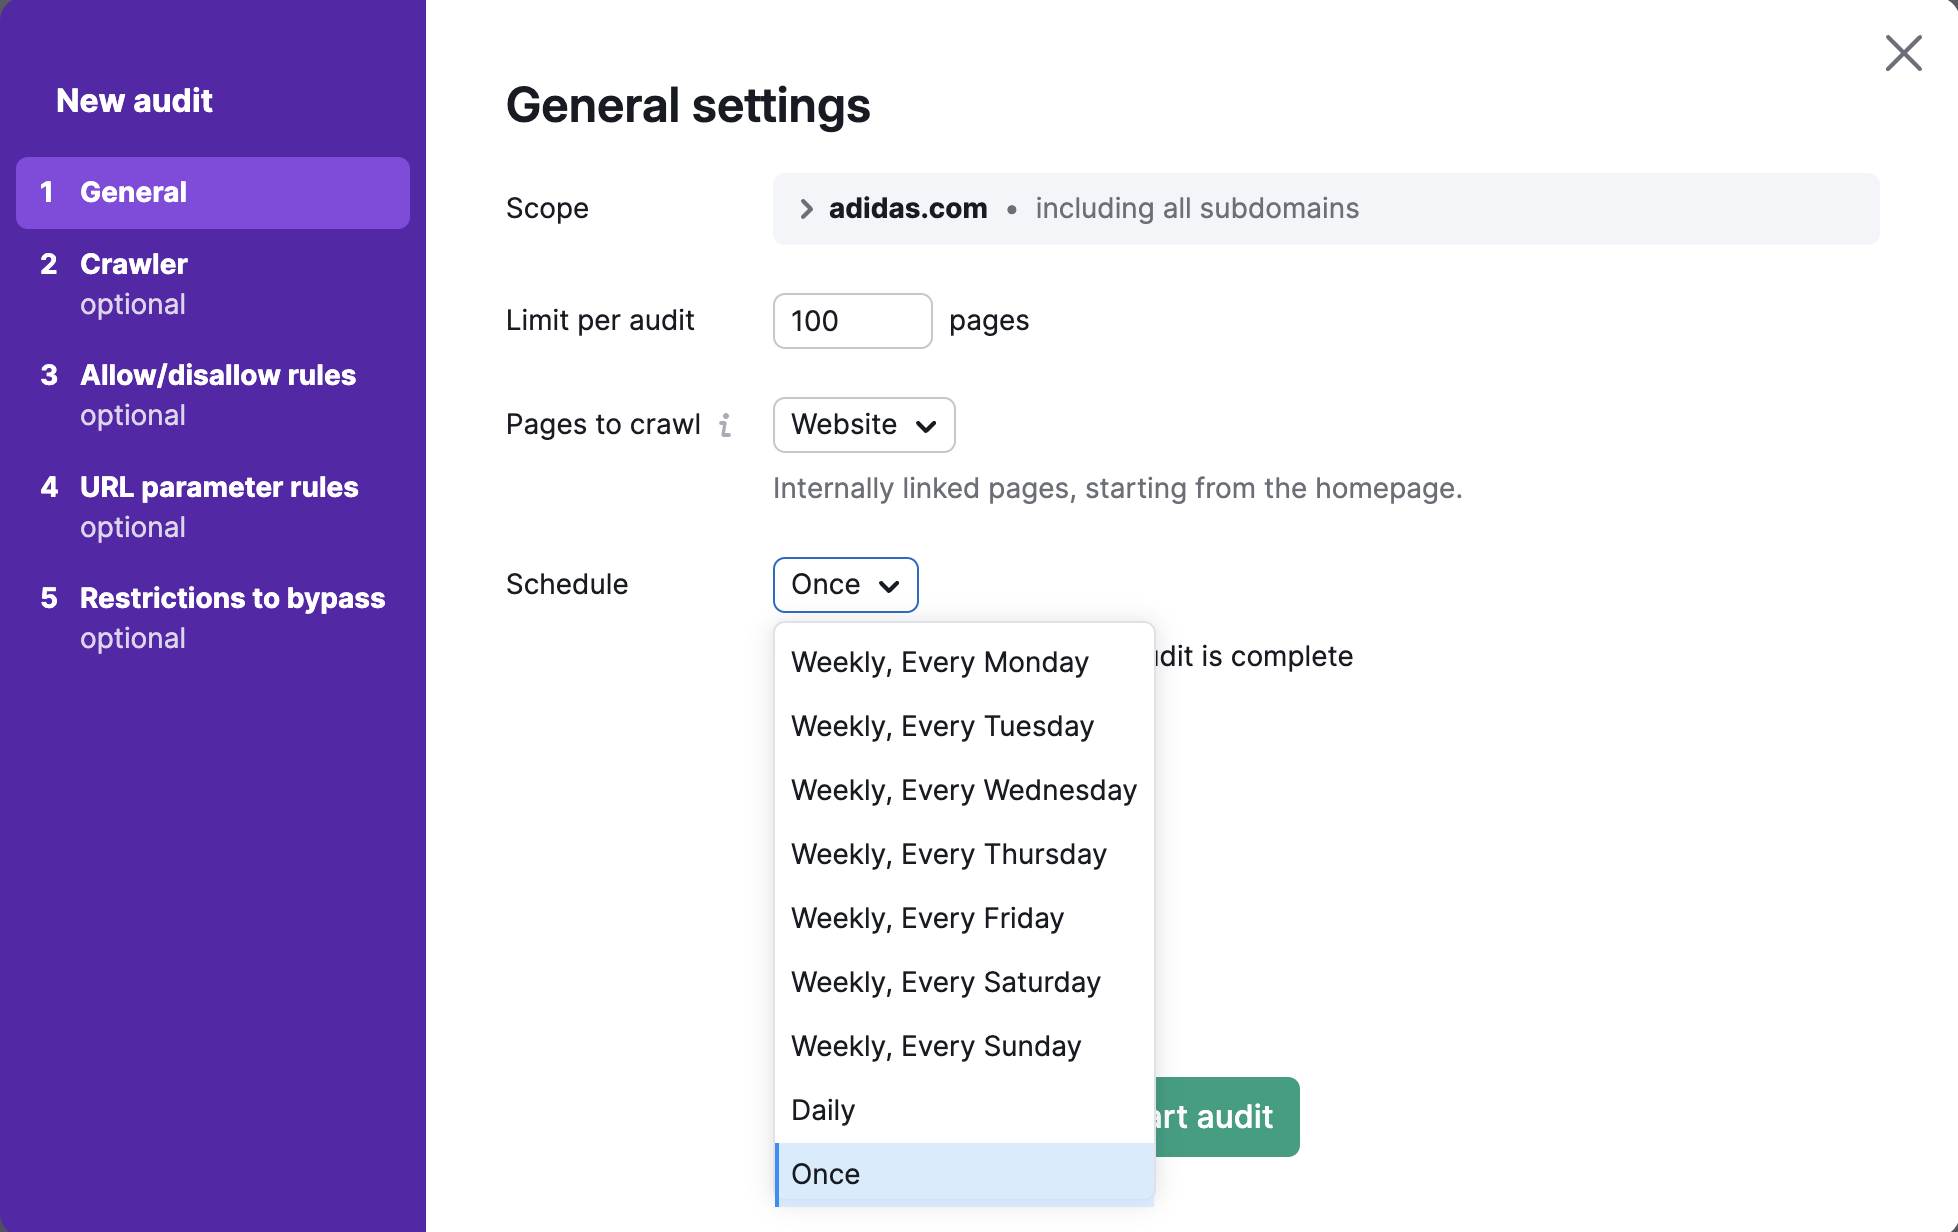
Lastly, select how often you would like us to automatically audit your website. Your options are:
- Weekly (choose any day of the week)
- Daily
- Once
You can always re-run the audit at your convenience.
After completing all of your desired settings, select “Start audit.”
Advanced Setup and Configuration
Note: The following steps of the configuration are advanced and optional.
Crawler Settings
This is where you can choose the user agent that you want to crawl your site. First, set your audit’s user agent by choosing between the mobile or desktop version of either the SemrushBot or the GoogleBot. You can also choose the OpenAI-Search user agent, which will check whether your website is crawlable with the new search bot.
By default we check your site with our mobile crawling bot that helps to audit your website in the same way Google’s mobile crawler would go through your website. You can change the bot to Semrush desktop crawler anytime.
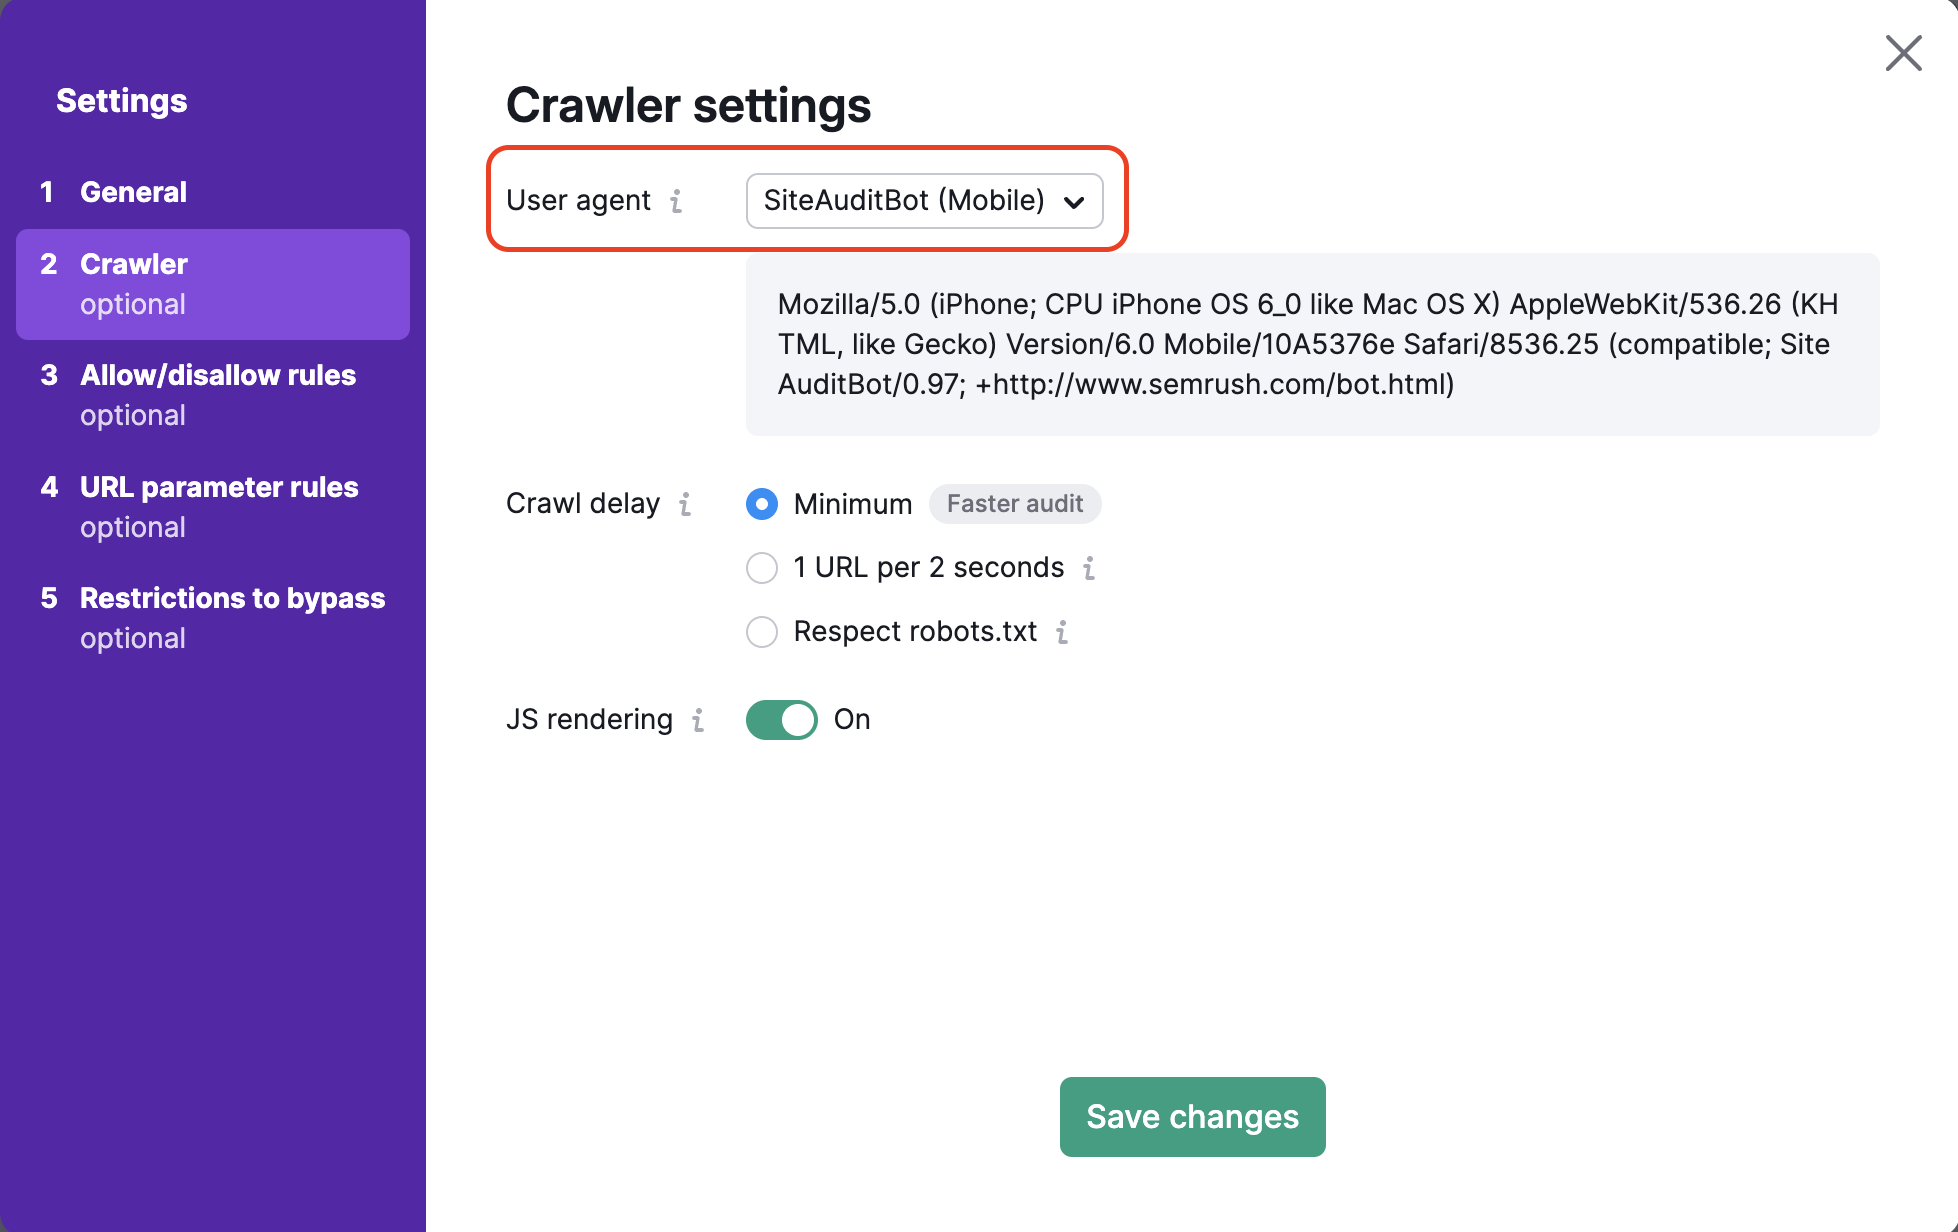
As you change the user agent, you’ll see the code in the dialog box below change as well. This is the user agent’s code and can be used in a curl if you want to test the user agent on your own.
Crawl-Delay Options
Next, you have 3 options for setting a crawl delay: Minimum delay, Respect robots.txt, and 1 URL per 2 seconds.
If you leave this minimum delay between pages checked, the bot will crawl your website at its normal rate. By default, SemrushBot will wait around one second before starting to crawl another page.
If you have a robots.txt file on your site and specified a crawl delay, then you can select the “respect robots.txt crawl-delay” option to have our Site Audit crawler follow that instructed delay.
Below is how a crawl delay would look like within a robots.txt file:
Crawl-delay: 20
If our crawler slows down your website and you do not have a crawl delay directive in your robots.txt file, you can tell Semrush to crawl 1 URL per 2 seconds. This may force your audit to take longer to complete, but it will cause fewer potential speed issues for actual users on your website during the audit.
Crawling Javascript
If you use JavaScript on your site, you can enable JS rendering in the settings of your Site Audit campaign. JavaScript rendering allows our crawler to execute JS files and see the same content your visitors do. That way, you get more accurate crawl results (pretty similar to the Googlebot ones) and a better picture of your site's health.
If JS rendering is disabled, Site Audit only looks at your site's HTML. Although crawling HTML is faster and doesn't slow down your website, audit results are less accurate.

Please note that this feature is only available with a Guru or Business SEO Toolkit subscription.
Allow/Disallow Rules
To crawl specific subfolders or block certain subfolders of a website, refer to the Allow/Disallow URLs Site Audit setup step. This step also allows auditing multiple specific subfolders at once.
Include everything within the URL after the TLD in the text box below. For example, if you wanted to crawl the subfolder http://www.example.com/shoes/mens/, you would want to enter /shoes/mens/ into the allow box on the left.
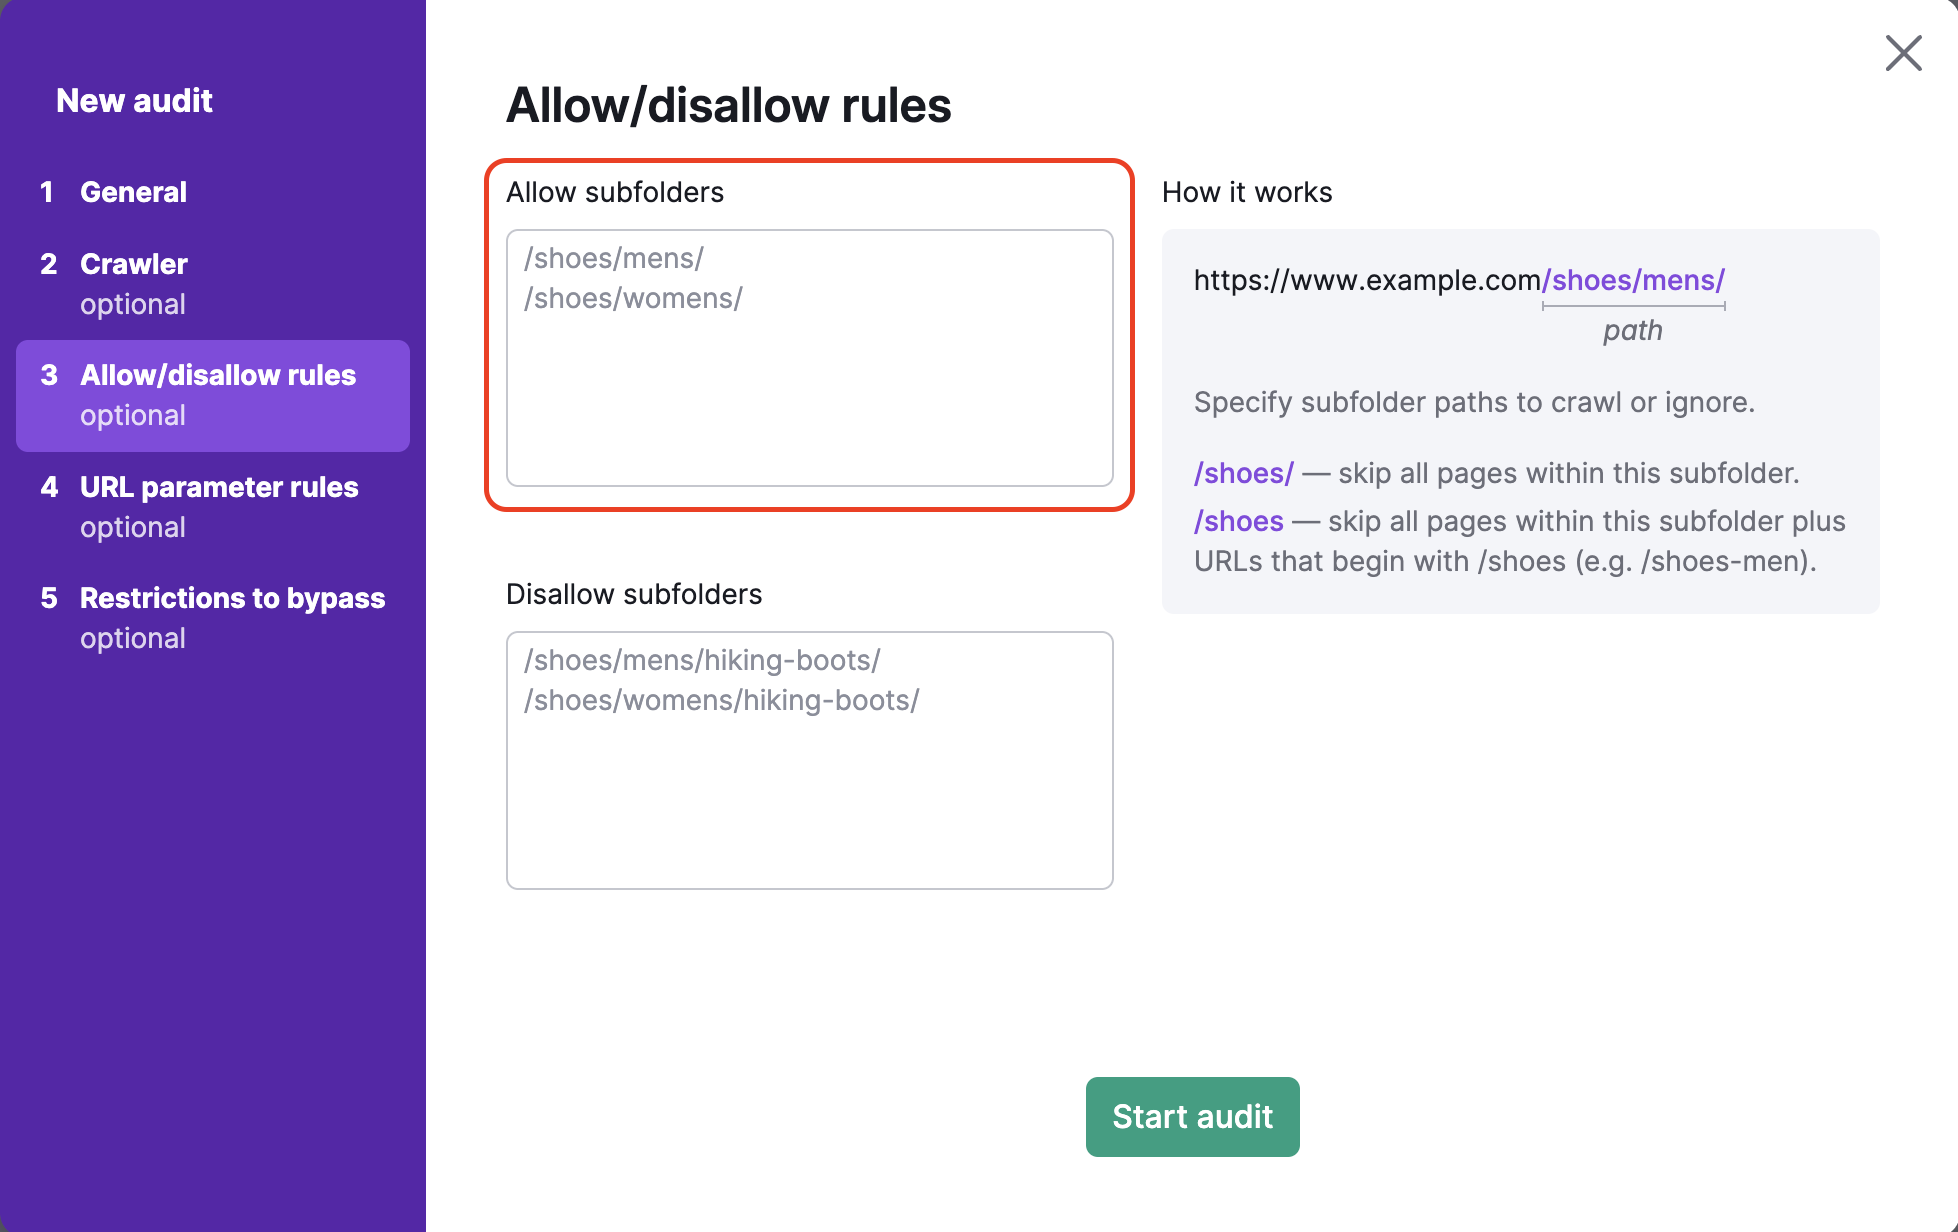
To avoid crawling specific subfolders, you would have to enter that subfolder’s path in the disallow box. For example, to crawl the men’s shoes category but avoid the hiking boots sub-category under men’s shoes (https://example.com/shoes/mens/hiking-boots/), you would enter /shoes/mens/hiking-boots/ in the disallow box.
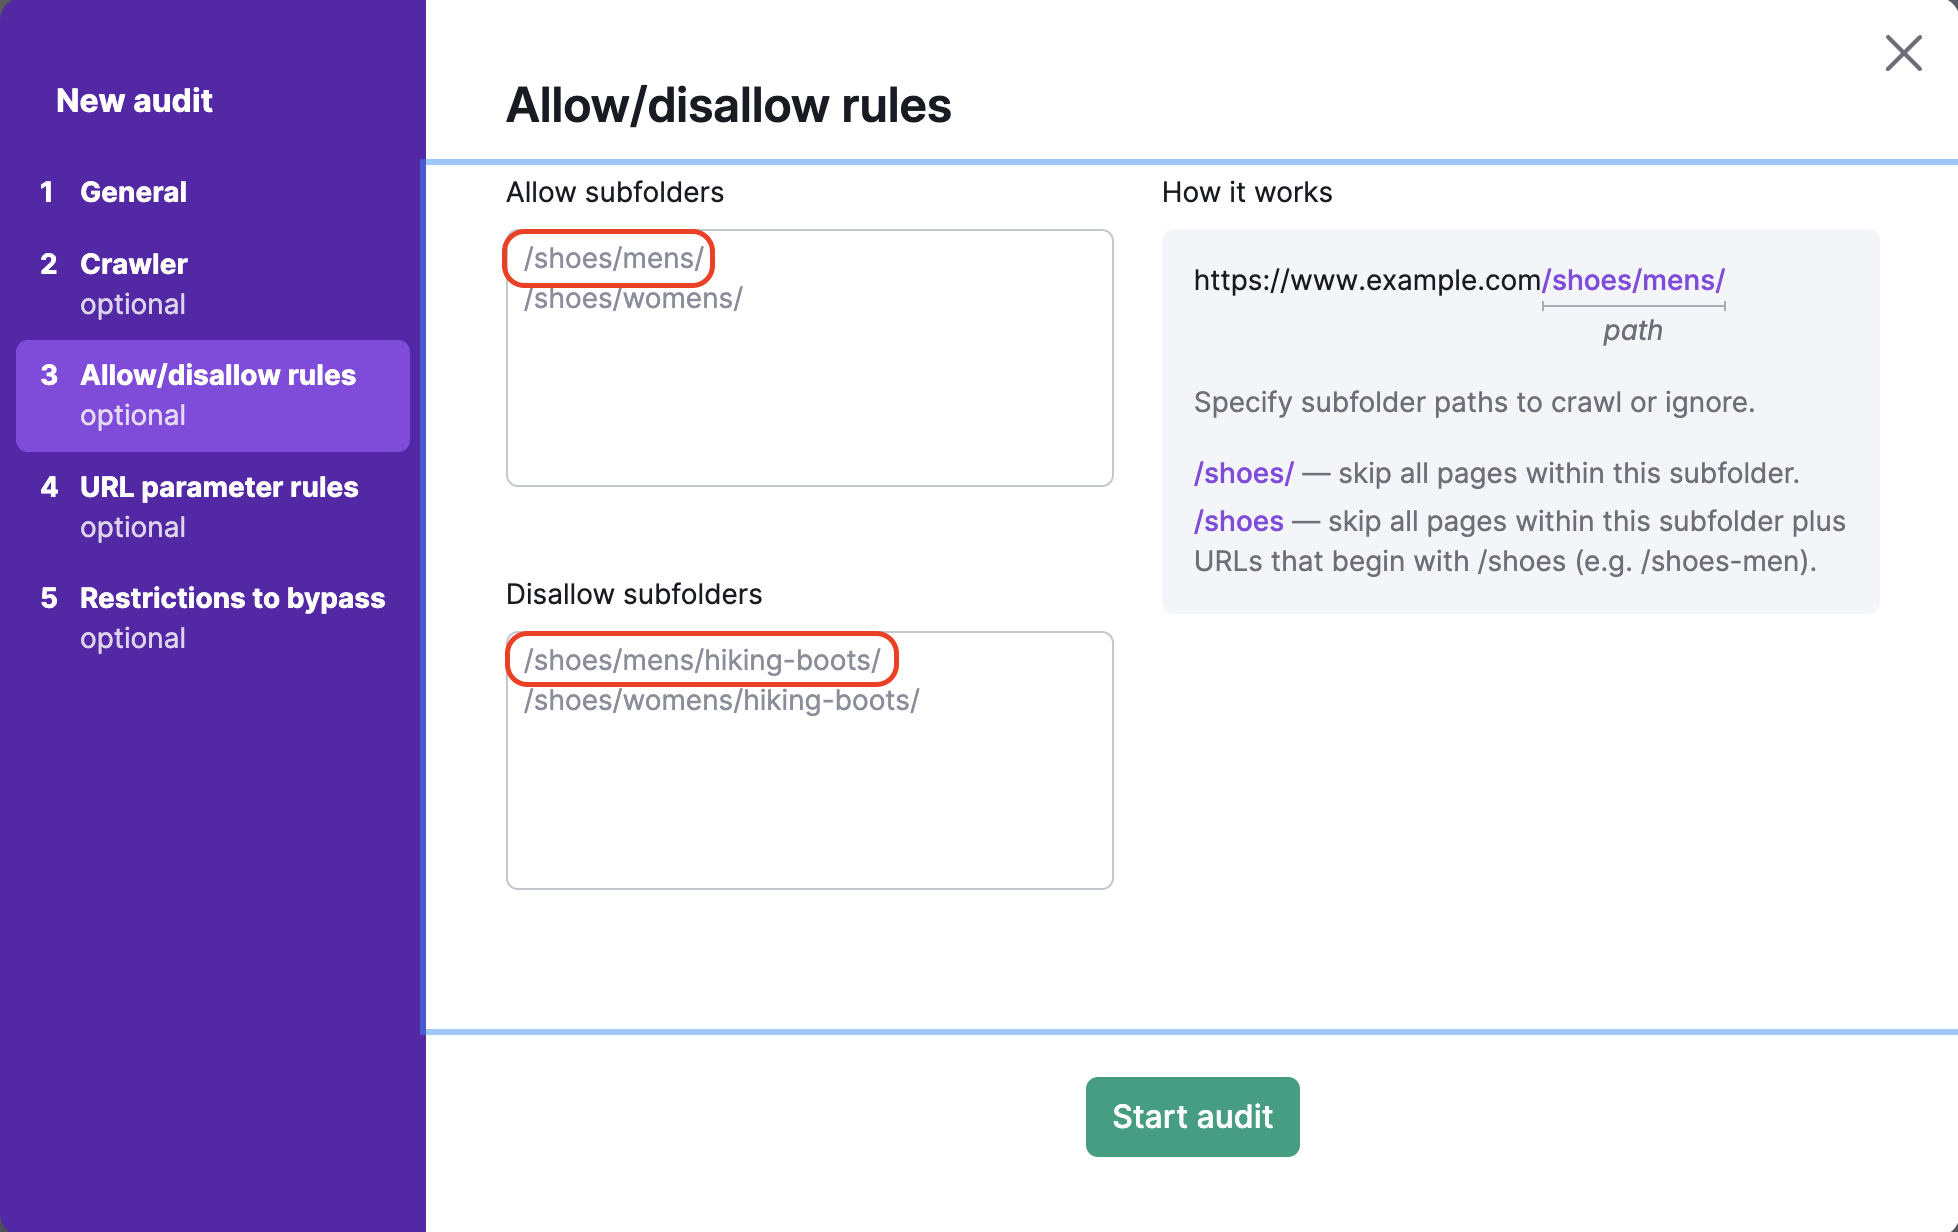
If you forget to enter the / at the end of the URL in the disallow box (ex: /shoes), then Semrush will skip all pages in the /shoes/ subfolder as well as all URLs that begin with /shoes (such as www.example.com/shoes-men).
URL Parameter Rules
URL parameters (also known as query strings) are elements of a URL that do not fit into the hierarchical path structure. Instead, they are added on to the end of a URL and give logic instructions to the web browser.
URL parameters always consist of a ? followed by the parameter name (page, utm_medium, etc) and =.
So “?page=3” is a simple URL parameter that could indicate the 3rd page of scrolling on a single URL.
The 4th step of the Site Audit configuration allows you to specify any URL parameters that your website uses in order to remove them from the URLs while crawling. This helps Semrush avoid crawling the same page twice in your audit. If a bot sees two URLs; one with a parameter, and one without, it may crawl both pages and waste your crawl budget as a result.
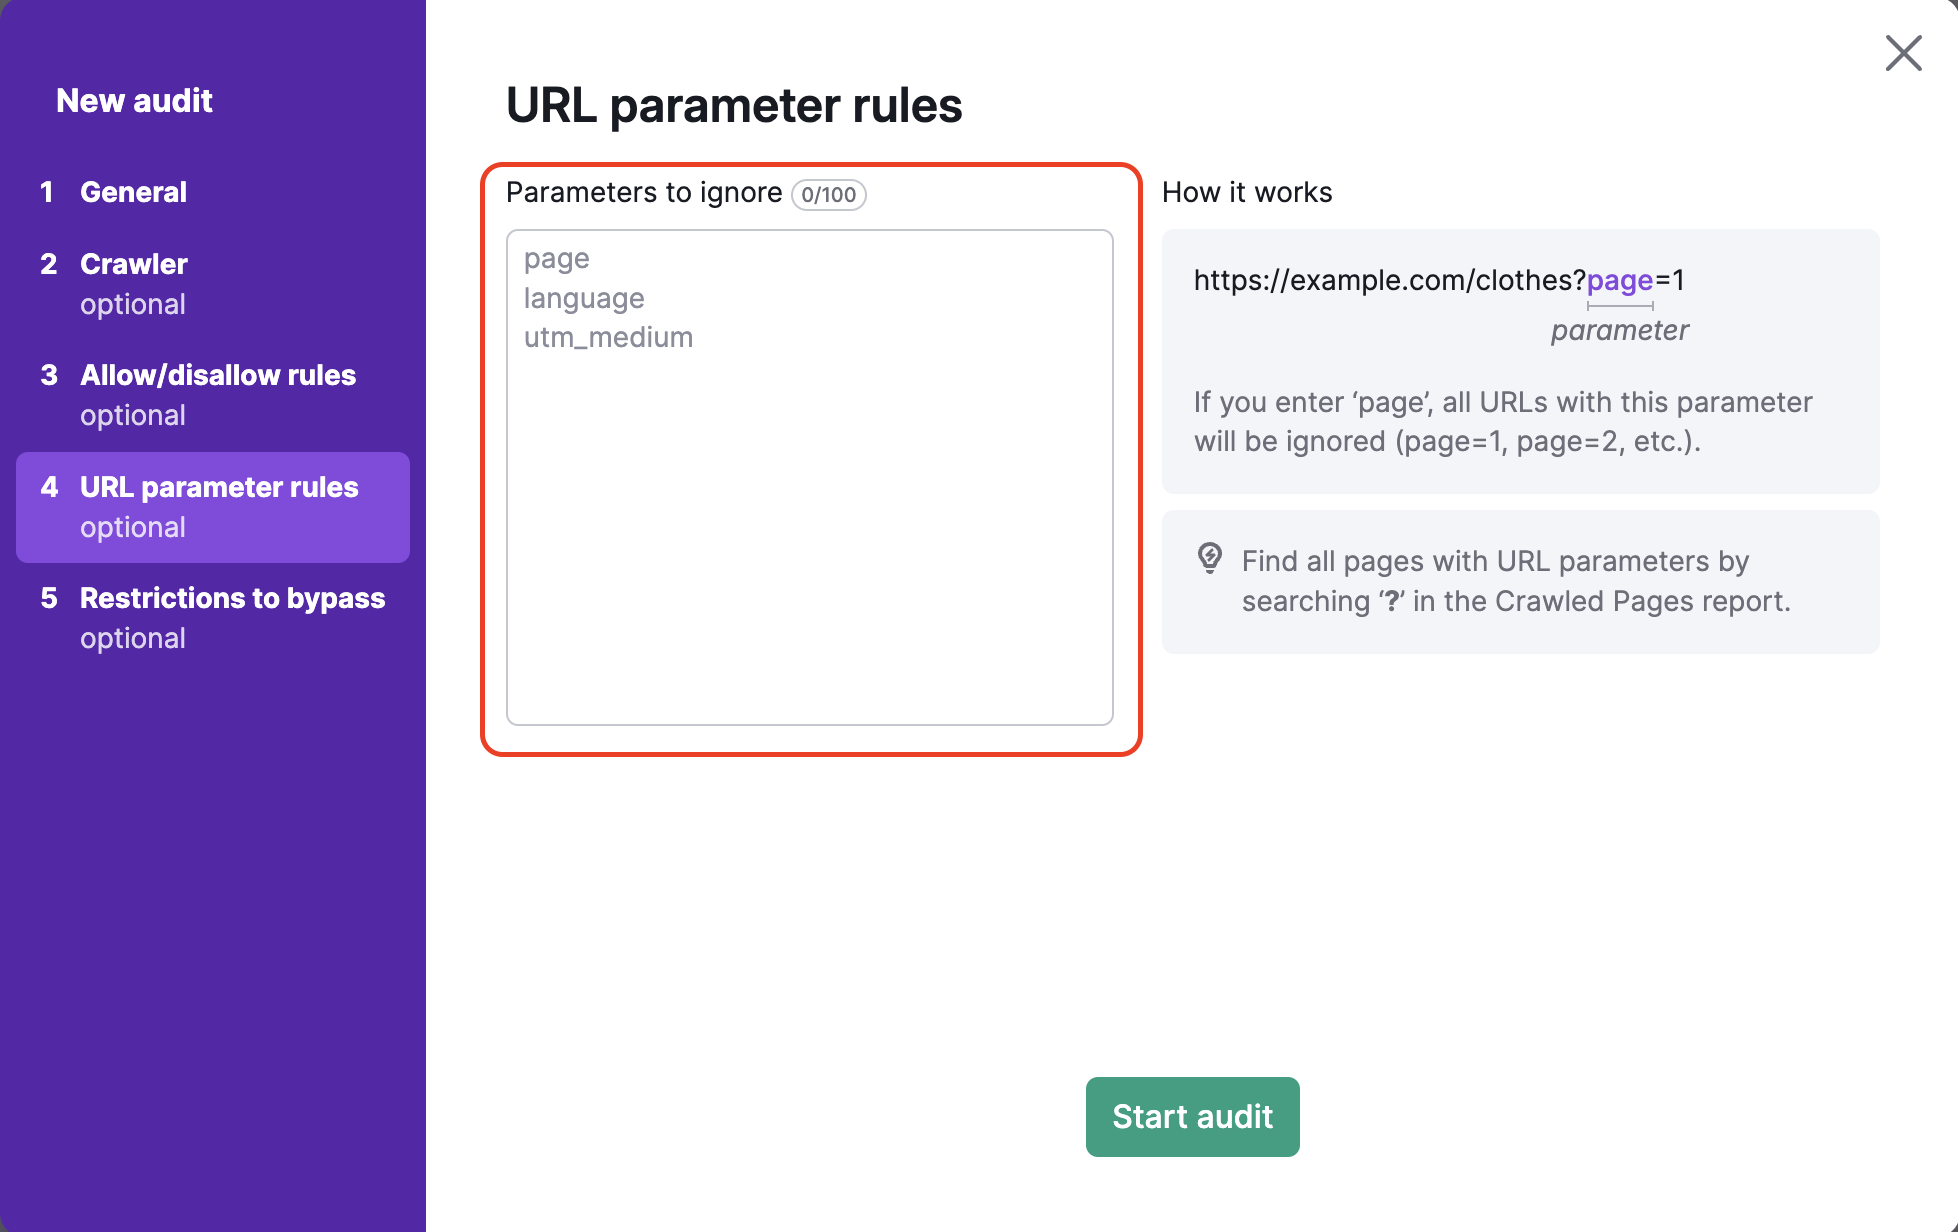
For example, if you were to add “page” into this box, this would remove all URLs that included “page” in the URL extension. This would be URLs with values such as ?page=1, ?page=2, etc. This would then avoid crawling the same page twice (for example, both “/shoes” and “/shoes/?page=1” as one URL) in the crawling process.
Common uses of URL parameters include pages, languages, and subcategories. These types of parameters are useful for websites with large catalogs of products or information. Another common URL parameter type is UTMs, which are used for tracking clicks and traffic from marketing campaigns.
If you already have a Site Audit campaign set up and would like to change your settings, you can do so using the Settings gear:
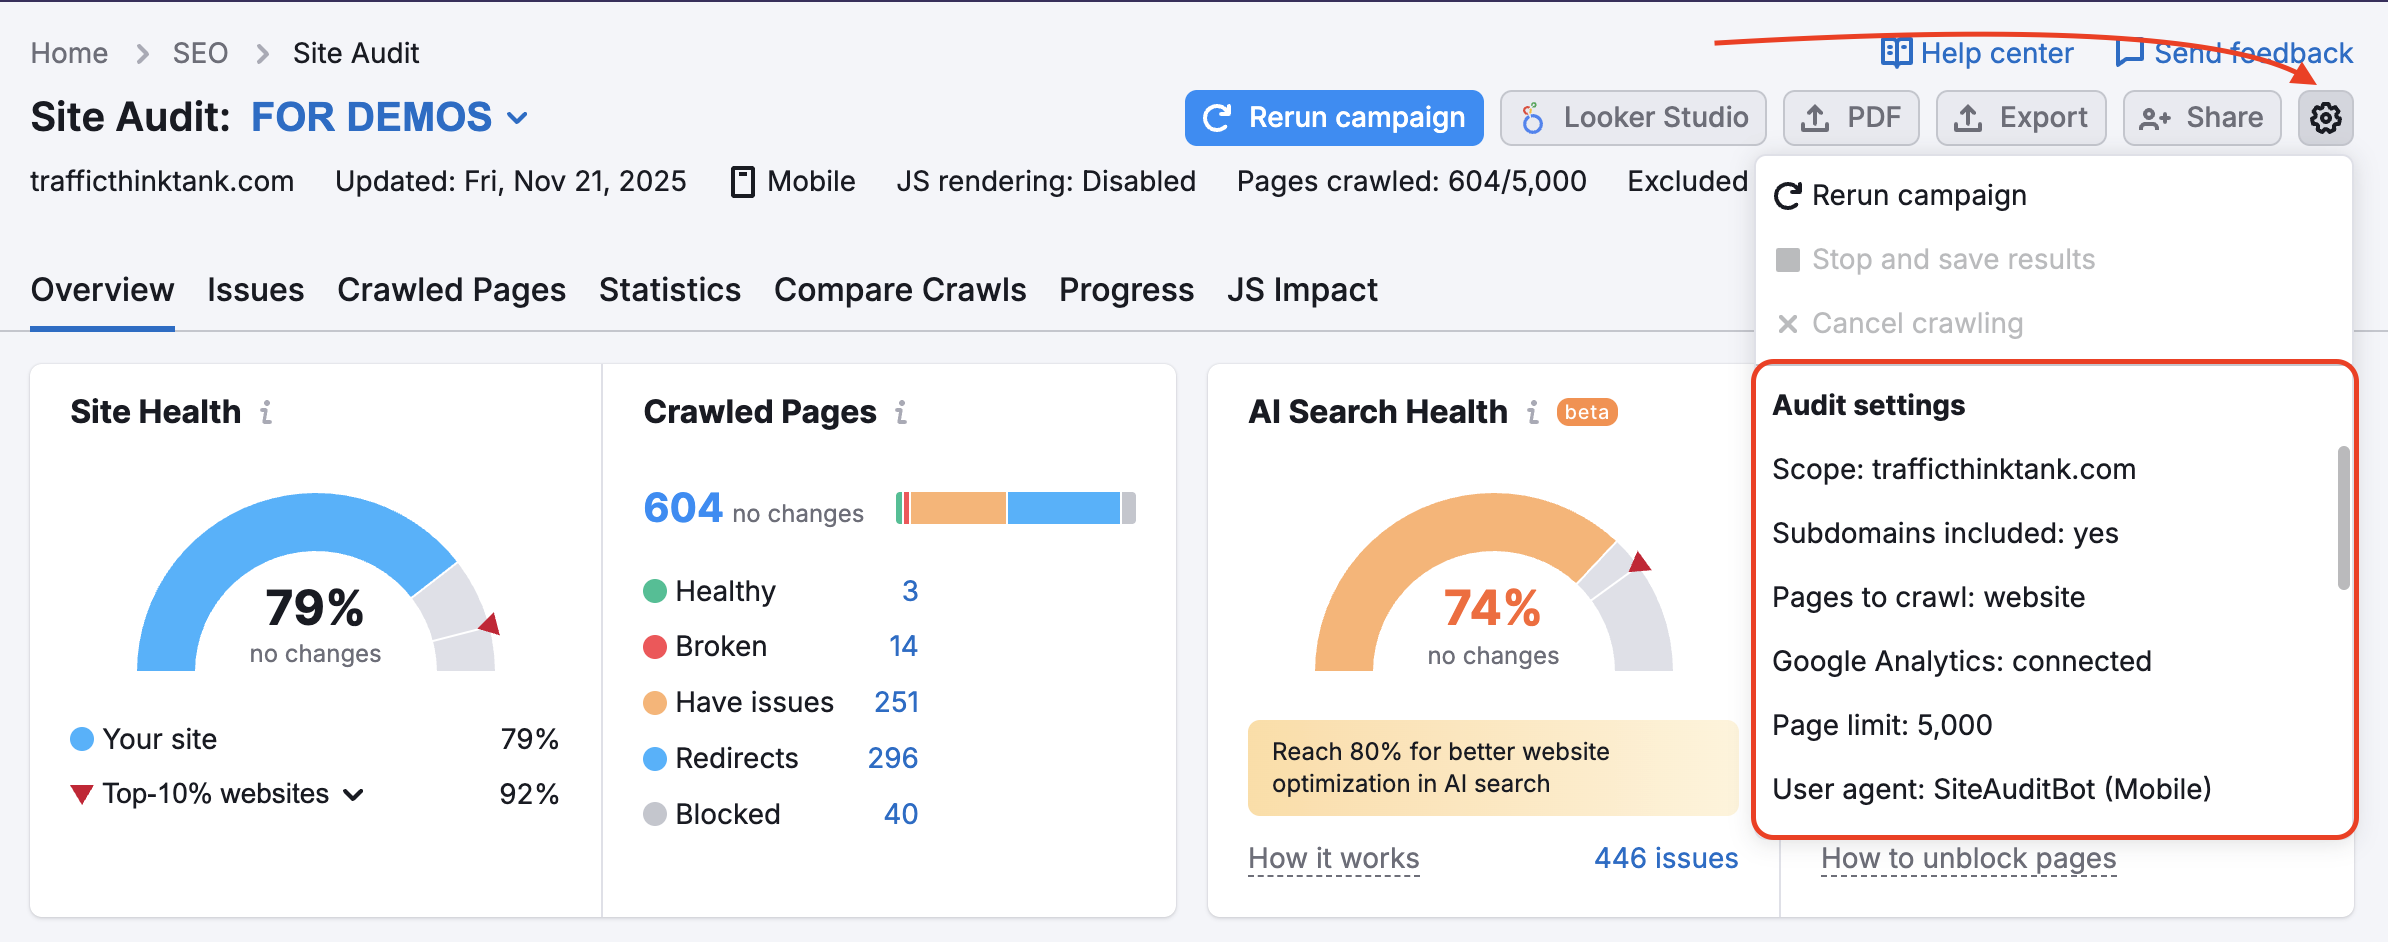
You will use the same directions listed above by selecting the “Masks” and “Removed Parameters” options.
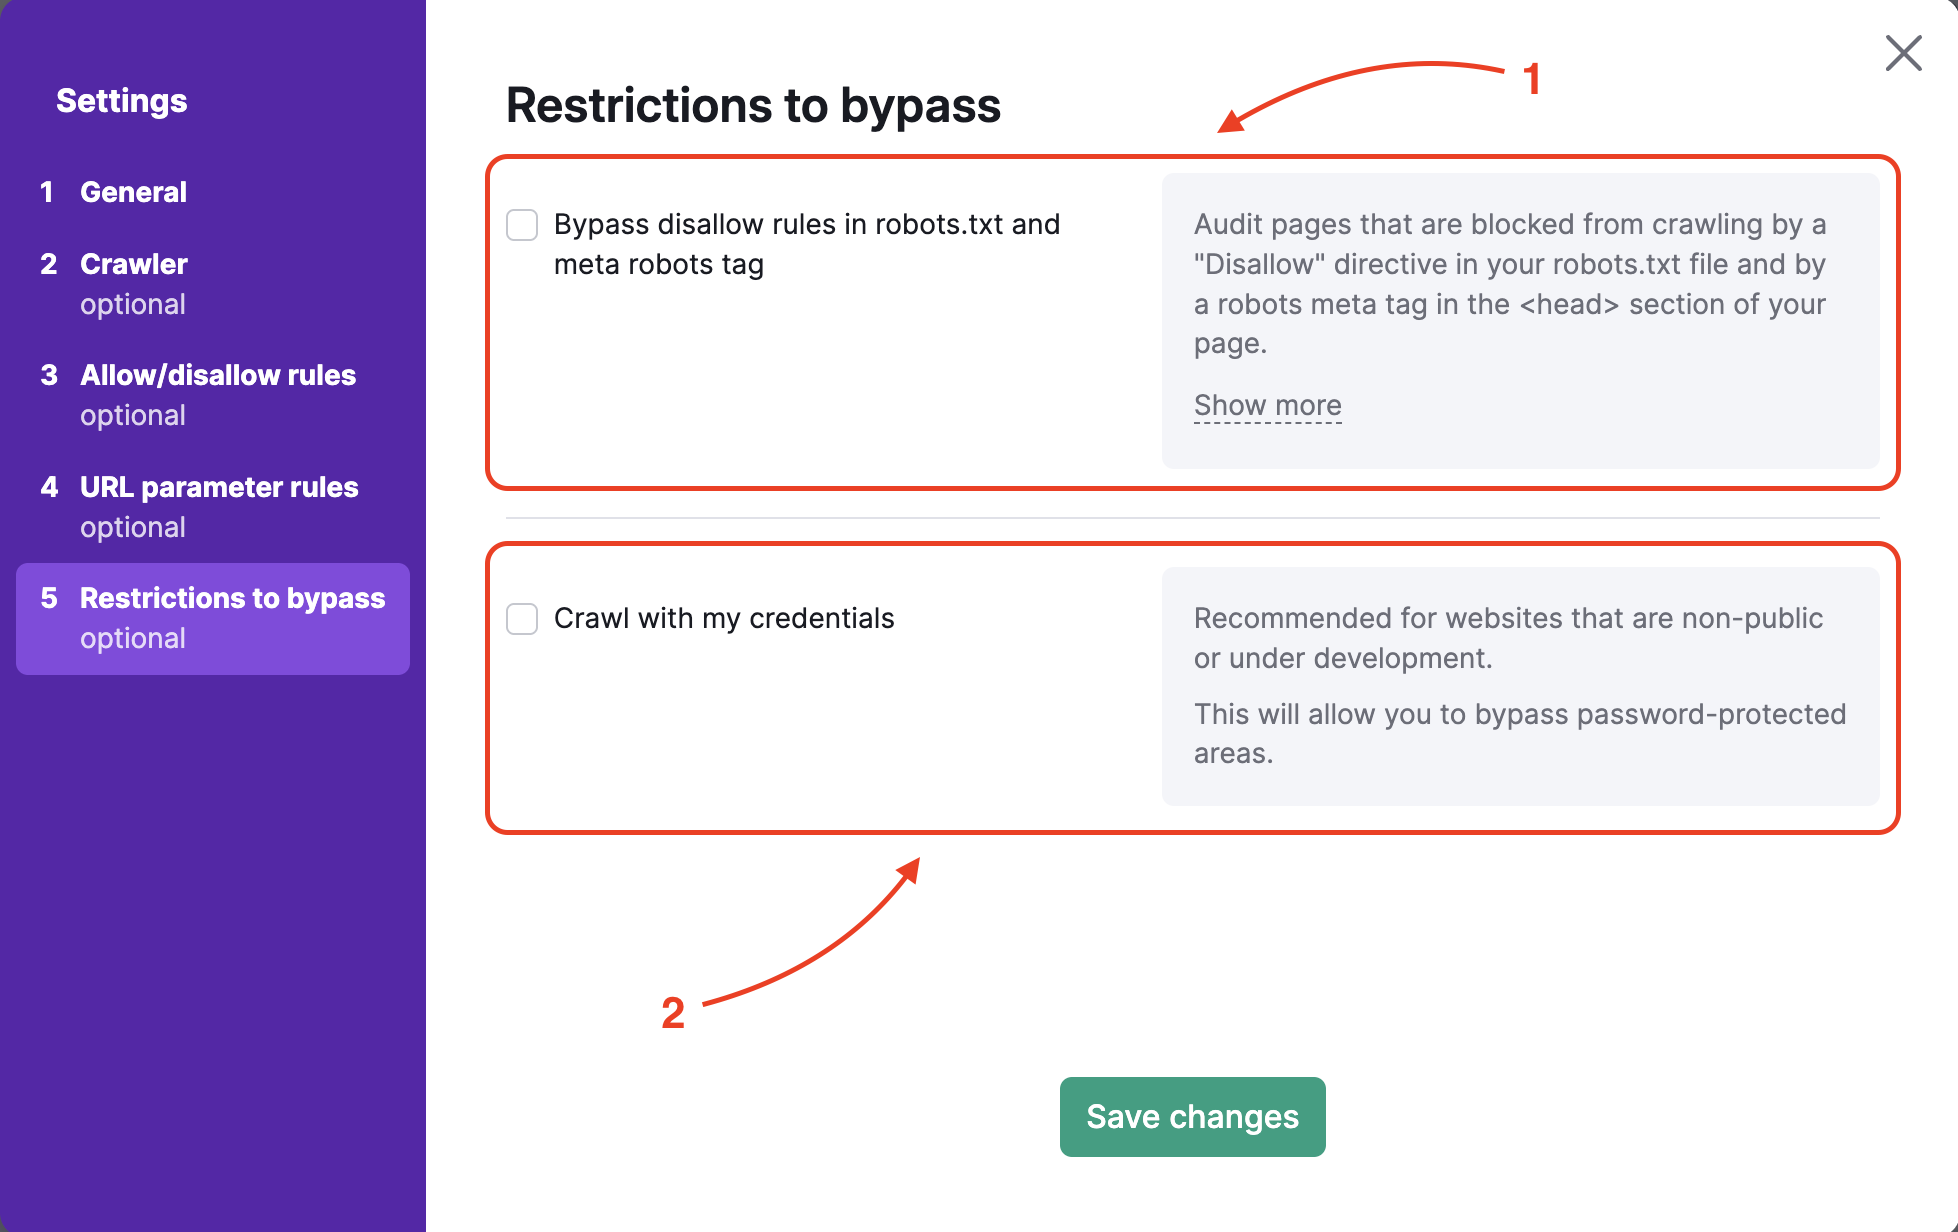
Restrictions to Bypass
To audit a website in pre-production or hidden by basic access authentication, step 5 offers two options:
- Bypassing the disallow in robots.txt and robots meta tag
- Crawling with your credentials to bypass password-protected areas
If you want to bypass disallow commands in the robots.txt or meta tag (usually, this would be found in your website’s <head> tag), you will have to upload the .txt file provided by Semrush to the main folder of your website.
You can upload this file the same way you would upload a file for GSC verification, for example, directly into your website’s main folder. This process verifies your ownership of the website and allows us to crawl the site.
Once the file is uploaded, you can start the Site Audit and gather results.
To crawl with your credentials, simply enter the username and password that you use to access the hidden part of your website. Our bot will then use your login info to access the hidden areas and provide you with the audit results.
Troubleshooting
In the case of an “auditing domain has failed” dialog, you will want to check that our Site Audit crawler is not blocked by your server. To ensure proper crawl, please follow our Site Audit Troubleshooting steps to whitelist our bot.
Alternatively, you can download the log file that’s generated when the failed crawl occurs and provide the log file to your webmaster so they can analyze the situation and try to find a reason why we are blocked from crawling.
Connecting Google Analytics and Site Audit
After completing the setup wizard, you will be able to connect your Google Analytics account to include issues related to your top-viewed pages.
If any issue persists with running your Site Audit, try Troubleshooting Site Audit.